
Okay, so I had a friend ask me "how do I take backyard portraits of my children"? Well, good question. This is a typical place to shoot pictures of our kids in the warmer months. I think there are some basic elements that will help you to achieve great results. So here's a few tips:
IT REALLY IS ALL ABOUT LIGHTING AND CLEAN BACKDROPS!
1) Find a good spot with a SIMPLE background. This might sound a little redundant from the last photo tip I gave, but it is one of the keys to getting a great photo. So, look for a fence, or a rock wall, or maybe even just the long lush grass (shooting downward at your subject. Try to avoid swing sets, scattered toys, etc. You want your background as simple as possible. Another great tip is to move in closer (or zoom in) to your subject, so they take up most of the frame. The photo is about your child right, not necessarily the background? Don't get too overwhelmed with backgrounds or trying to find the perfect spot, just find something that is simple, something that won't stick out in the back of your child's head. Find a background that will fade away from your subject, especially at a close range. (Use a wide aperture like 2.8 and if you are close enough, your background will only be a blur, literally. If you don't know much about aperature, what it does or how to change it, let me know and maybe that can be our next discussion. For now, put it in A-mode and set it to 2.8. If your lens will not open to a 2.8, then go as low (or as wide) as you can.
2) Once you've found a spot that is good, then you need to evaluate the light. Is the light direct? Or is your spot in open shade? Is it back-lit? Depending on the light you are shooting at, your results will vary dramatically. For starters, I highly recommend shooting in open shade. What is open shade? Well, it is just what it sounds like: open shade is simply an area out-doors that is shaded from the direct light of the sun, therefore being illuminated by reflected light.
If your backyard does not have good open shade (and let me tell you, mine does not), then you either a) have to create some open shade, or b) try your front yard (or another side of your home). You may even need to wait for the light to change in your yard. Early morning or late evening will work best to create these open shade areas.
So, how do you create open shade if you can't shoot anywhere else? I know this sounds tedious, and time consuming (and it can be), but you can put up a white sheet (not a colorful one... or it will cast a color on your subject that might be unpleasing). Find a way to secure it, or have grandma or a friend hold it so that it blocks out the direct light where you are shooting. A big reflector is nice to block light, as well. But, if you don't have one, just find a sheet or a blanket.
Once you've achieved nice, even light over your subject, you are ready to shoot! Pay attention to what's going on in your area of view within the camera. Keep checking your light (open shade) your background as you move, etc. When you or your subject move, is the background still simple, or do you now have a swing set distracting in the background?
I NEED YOUR FEEDBACK. I would like to know if my photo tips are too simplified or too complicated. I'm not sure who my audience is. So please SHARE SOME LOVE and comment away! I hope that I can make these photo tips meaningful to you! Oh, and please feel free to ask questions. Your question just may be the next topic of discussion!
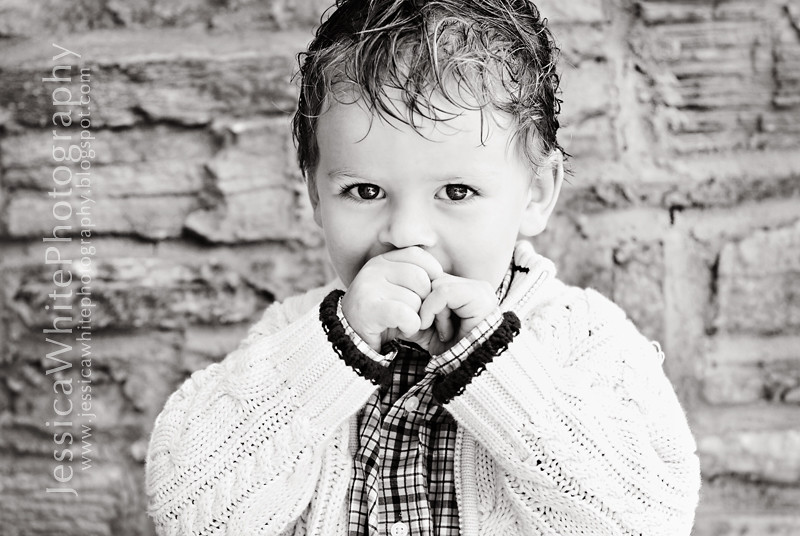
Here is an example of a backyard (well, front yard) portrait...
I was doing a newborn session at someone's home, when the mother asked me if I could snap a few photos of her boy. We went outside to find a nice spot. I quickly found out that the backyard wasn't the best spot because the light was too directional and the boy was squinting (even in the open shade area we found near the house. So, I took the child to the front yard, up to their porch. We found open shade, and a nice rock backdrop. So, once I found all the elements I was looking for, then we started to shoot. I zoomed in pretty close on this little guy so that the picture would be all about him, and not where he was located.

LOVE THIS! Photographers are very reluctant to share their know-how. Thank you! For sure I definitely need a little aperture 101. Great idea for the next one. I'll be watching. :>
ReplyDeleteThis is awesome! Thank you for sharing. I for one would LOVE to learn more about aperture. I don't even know how to find it on my camera to even change the setting to experiment with it. I'm SO a beginner!
ReplyDeleteWhat a cute little boy;) I just realized you only want comments for this section...sorry. But those tips for backgrounds and aperture are so helpful. Thank you! I could definitely use some more tips on aperture, lighting and composition. I'm never sure how to pose...or not to pose my kids at all.
ReplyDeleteThanks for the comments! It really helps me to know where to take the next discussion! Keep coming back!
ReplyDeleteI LOVE your tips!! Any pointers on composition? How do you decide what pose to do with each backdrop and then which angle to put your camera? Higher? Lower? Close? Far away? That has been my biggest struggle! Anything you have would be wonderful!
ReplyDelete